Best Product! We recommended...

Wednesday, April 1, 2009

Carving Turkey

There was a time when, a gentleman’s education was not complete until he had mastered the art of carving. Those days are long since forgotten. By 1928, Emily Post had dropped the section on carving from her book on etiquette all together.

Many a noble bird has been hacked to shreds at the hands of unskilled knife-wielding relatives and friends, as horrified cooks looked on. This year – avoid the public carnage. Learn the simple art of carving like a pro.

Whether the bird is carved in the kitchen or at the dining room table, it simply must be done before anyone can eat. And it’s not that difficult.

Tools – Meat fork with long tines, sharpened carving knife or chef's knife, small cutting board on the side and a kitchen towel or napkin.

  • Allow the turkey to rest 20 minutes after cooking. This lets juices saturate the bird evenly again for better slicing. Remember that you must cut the bird apart at the joint, hacking though the bone is not an option.

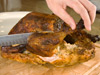
  • With an air of confidence, start with the dark meat. Secure the turkey at the breastbone with a carving fork or better yet, use a folded napkin.

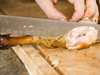
  • Cut through the skin between the leg and body. Press the leg downward until it is lying flat against the platter. Now you can see the hip joint. Cut through the joint and remove the leg and thigh to a cutting board.

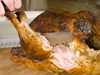
  • Cut the thigh and drumstick apart at the joint. Remove the skin and slice around both sides of the thighbone, removing the meat. Leave the drumstick whole. Repeat on the other side.

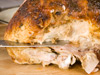
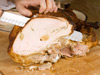
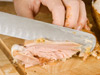
  • For the breast: Hold the turkey with a large fork at the breastbone. Slice about 2 inches down one side of the breastbone, gently separating the meat from the bone. Now make a horizontal slice across the grain of the meat. Remove the entire section of breast meat to a cutting board. Holding with a fork, cut into slices. Place slices on platter. Repeat process on the other side.

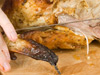
  • For the wing: Cut into the joint slightly above the wing and remove it to the cutting board. Cut the wing in two pieces at the joint. Slice from the meaty part or serve whole. Save the tip for soup.

  • For the drumstick: Cut slices parallel to the bone, turn and repeat.

Practice on a chicken during the off-season. Nothing to it!

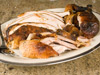
Turkey is the most popular entrée for the holiday season and its arrival at the table is the highlight of the meal. Whether you carve the turkey at the table or in the kitchen, sharpen the knife and get to it.

Thursday, March 19, 2009

Stuffed Roast Turkey

For uniform cooking results, the USDA recommends cooking the stuffing outside of the bird. If you insist on stuffing the turkey, stuff loosely and follow the steps below.

1. Preheat oven to 325°F. Check the wrapper to see how much the turkey weighs and determine approximate cooking time (see chart below) Remove the giblet bag from the breast and remove the neck from the turkey cavity. Wash the turkey inside and out and pat skin dry with paper towels.

2. Mix stuffing and lightly fill cavity. Allow 1/2 to 3/4 cup stuffing per pound of turkey. It is safer to understuff than to overstuff the turkey. Stuffing expands during cooking. Refrigerate any leftover stuffing and bake in greased casserole during the last hour of turkey roasting time.

3. Place turkey breast side up on a rack in a shallow (about 2 inches deep) roasting pan. Insert meat thermometer in thigh . Add up to 1/2 cup water to the bottom of the pan, if desired.

4. Cover turkey loosely with a tent of heavy-duty aluminum foil. Cooking time takes longer for a stuffed turkey. For example, a 20 pound stuffed turkey will take 4 1/4 to 5 1/4 hours to cook. (See timetable below).

5. Remove the foil cover after about 1 to 1 1/2 hours of cooking to brown the skin. Brush with vegetable oil to enhance browning, if desired.

6. A whole turkey is done when the temperature in the innermost part of the thigh reaches a minimum internal temperature of 165°F as measured with a food thermometer. Check the temperature in the thickest part of the breast, the wing and the stuffing. The stuffing must reach 165°F or higher, if it is not, return it to the oven and continue cooking.

7. Check the internal temperature of the stuffing. Insert the thermometer through the cavity into the thickest part of the stuffing and leave it for 5 minutes. Or use an instant red thermometer which will register the temperature after 15 seconds. The stuffing temperature will rise a few degrees after the turkey is removed from the oven. If the center of the stuffing has not reached 165°F after stand time, return the turkey to the oven and continue cooking.

8. Allow turkey to set 20 minutes before removing stuffing and carving to allow juices to saturate the meat evenly.

USDA Roasting Timetable for Fresh or Thawed Turkey at 325°F.

These times are approximate and should always be used in conjunction with a properly placed thermometer.

Stuffed
8 to 12 pounds 3 to 3 1/2 hours
12 to 14 pounds 3 1/2 to 4 hours
14 to 18 pounds 4 to 4 1/4 hours
18 to 20 pounds 4 1/4 to 4 3/4 hours
20 to 24 pounds 4 3/4 to 5 1/4 hours

The USDA does not recommend cooking turkey in an oven set lower than 325°F.

Traditional Roast Turkey (unstuffed)


1. Preheat oven to 325°F. Check the wrapper to see how much the turkey weighs and determine approximate cooking time (see chard below). Remove the giblet bag and the neck from the turkey cavity. Wash the turkey inside and out and pat skin dry with paper towels.

2. Place turkey breast side up on a rack in a shallow (about 2 inches deep) roasting pan. Insert meat thermometer in thigh. Add 1/2 cup water to the bottom of pan, if desired.

3. Cover turkey loosely with a tent of heavy-duty aluminum foil. Roast the turkey until temperature in the innermost part of the thigh reaches 165°F as measured with a food thermometer. Check the wing and the thickest part of the breast. You may choose to cook the turkey to higher temperatures. Cooking time will vary. For example, a 20 pound turkey will take 4 1/4 to 5 hours to cook, check the temperature on the thermometer after 4 1/4 hours.

4. Meanwhile, mix the stuffing or dressing. Place in a casserole and pop it into the oven during the last hour or so of roasting time.

5. Remove the foil tent after 1 to 1 1/2 hours of cooking time to brown the skin. Brush with vegetable oil to enhance browning, if desired.

6. A whole turkey (and turkey parts) is safe when cooked to a minimum internal temperature of 165 °F as measured with a food thermometer. Check the internal temperature in the innermost part of the thigh and wing and the thickest part of the breast. For reasons of personal preference, consumers may choose to cook turkey to higher temperatures.

7. Allow the turkey to set 20 to 30 minutes before carving to allow juices to saturate the meat evenly.

Note: Cooking times do vary. Why? There are many reasons - oven temperature may not be completely accurate, the turkey may be very cold or partially frozen, and/or the roasting pan may be too small which inhibits the flow of heat. The USDA highly recommends use of a meat thermometer to determine doneness of turkey.

Unstuffed
8 to 12 pounds 2 3/4 to 3 hours
12 to 14 pounds 3 to 3 3/4 hours
14 to 18 pounds 3 3/4 to 4 1/4 hours
18 to 20 pounds 4 1/4 to 4 1/2 hours
20 to 24 pounds 4 1/2 to 5 hours


Thursday, March 5, 2009

TOP 10 super tips fo turkey

Our TOP 10 super tips will ensure your big bird is the best it can be. ..Whether you're tackling a Thanksgiving turkey for the first or hundredth time...

1. Thawing a frozen turkey requires patience. The safest method is to thaw turkey in the refrigerator. Be sure to plan ahead — it takes approximately 3 days for a 20 pound turkey to fully defrost.

2. For crisper skin, unwrap the turkey the day before roasting and leave it uncovered in the refrigerator overnight.

3. Cooking times will differ depending on whether your bird was purchased fresh or frozen. Plan on 20 minutes per pound in a 350 degree F oven for a defrosted turkey and 10 to 15 minutes per pound for fresh.

4. A turkey will cook more evenly if it is not densely stuffed. Consider adding flavor by loosely filling the cavity with aromatic vegetables — carrots, celery, onion or garlic work nicely — or by carefully tucking fresh herbs underneath the breast skin. For the stuffing lovers, cook the dressing in a casserole dish on the side.

5. For even roasting, truss your turkey.

6. Before roasting, coat the outside of the turkey with vegetable or olive oil, season with salt and pepper and tightly cover the breast with aluminum foil to prevent over-browning (it will be removed in step 7).

7. Don't be a peeping tom (no pun intended)! Once you get the turkey in the oven, resist the temptation to open the oven door and admire your handiwork. When the oven temperature fluctuates, you're only increasing the likelihood of a dry bird. About 45 minutes before you think the turkey is done, remove the foil from the breast to allow it to brown.

8. Remove the turkey from the oven when the deepest spot between the leg and the breast reads 180 degrees F on an instant-read thermometer. Check the internal temperature of the stuffing as well; it should be at least 165 degrees.

9. Tent the bird with foil and let rest for about 15 minutes before carving. If you need more time to make gravy, heat up side dishes, etc., you can let the turkey set for up to an hour without losing too much heat.

10. Remember to carve your turkey with a very sharp or electic knife.

Friday, February 20, 2009

Carving Turkey


Step by step carving turkey for beautiful serving

1. First of all, don't get bogged down by trying to carve tableside. Though a common tradition in many families, it's perfectly fine to carve the turkey in the kitchen and bring the arranged platter to the table. This especially holds true if you're a novice at carving.

The Tools

  • Use a carving knife or a chef's knife. The longer the knife, the better it will work, as a long, smooth slicing motion will make for better slices.
  • We used a long carving knife with oval indentations along the blade to reduce friction.
  • Be sure to let the turkey rest for at least 25 minutes before slicing: this helps the juices redistribute through the meat, making for a better-tasting turkey. (It also makes it easier to carve.)

2. Remove the drumsticks and thighs. Start by pulling a drumstick away from the bird and using the knife to disconnect the thigh bone from the body. Set it aside to carve later, and remove the second drumstick.

3. Remove the wings in the same fashion to fully expose the breast for carving. The wings on modern, commercial birds contain very little meat, so they're often used mainly for presentation on the platter.

4. To carve the bird, make sure it's lying on its back, breast-side up. Begin with a long horizontal cut at the base of the breast. You might be able to feel where the breast meat ends and the bone begins--cut as close to that area as you can.

5. Begin slicing the breast from the top down, working at a slight angle to cut away from the carcass. The horizontal cut at the bottom provides a convenient stopping point, making it easy to finish each cut. Transfer slices to a warmed serving platter.

6. To carve a drumstick, hold one end and slice off one side. Lay it flat on the cutting board and continue carving. Slice each side, turning the drumstick a quarter turn until you've removed all the meat.

7. Place the thigh on the cutting board and begin slicing parallel to the thigh bone. Cut into even strips.

8. Arrange the rest of the meat onto the warmed platter and serve.

Turkey Thanksgiving Soup


INGREDIENTS

  • 1 leftover turkey carcass
  • 3 medium onions, chopped
  • 2 large carrots, diced
  • 2 celery ribs, diced
  • 1 cup butter, cubed
  • 1 cup all-purpose flour
  • 2 cups half-and-half cream
  • 1 cup uncooked long grain rice
  • 2 teaspoons salt
  • 1 teaspoon chicken bouillon granules
  • 3/4 teaspoon pepper

DIRECTIONS

  1. Place turkey carcass in a soup kettle or Dutch oven and cover with water. Bring to a boil. Reduce heat; cover and simmer for 1 hour. Remove carcass; cool. Set aside 3 qt. broth. Remove turkey from bones and cut into bite-size pieces; set aside.
  2. In a soup kettle or Dutch oven, saute the onions, carrots and celery in butter until tender. Reduce heat; stir in flour until blended. Gradually add 1 qt. of reserved broth. Bring to a boil; cook and stir for 2 minutes or until thickened.
  3. Add cream, rice, salt, bouillon, pepper, remaining broth and reserved turkey. Reduce heat; cover and simmer for 30-35 minutes or until rice is tender.

Juicy Thanksgiving Turkey


INGREDIENTS

  • 2 tablespoons dried parsley
  • 2 tablespoons ground dried rosemary
  • 2 tablespoons rubbed dried sage
  • 2 tablespoons dried thyme leaves
  • 1 tablespoon lemon pepper
  • 1 tablespoon salt
  • 1 (15 pound) whole turkey, neck and giblets removed
  • 2 stalks celery, chopped
  • 1 orange, cut into wedges
  • 1 onion, chopped
  • 1 carrot, chopped
  • 1 (14.5 ounce) can chicken broth
  • 1 (750 milliliter) bottle champagne

DIRECTIONS

  1. Preheat an oven to 350 degrees F (175 degrees C). Line a turkey roaster with long sheets of aluminum foil that will be long enough to wrap over the turkey.
  2. Stir together the parsley, rosemary, sage, thyme, lemon pepper, and salt in a small bowl. Rub the herb mixture into the cavity of the turkey, then stuff with the celery, orange, onion, and carrot. Truss if desired, and place the turkey into the roasting pan. Pour the chicken broth and champagne over the turkey, making sure to get some champagne in the cavity. Bring the aluminum foil over the top of the turkey, and seal. Try to keep the foil from touching the skin of the turkey breast or legs.
  3. Bake the turkey in the preheated oven for 2 1/2 to 3 hours until no longer pink at the bone and the juices run clear. Uncover the turkey, and continue baking until the skin turns golden brown, 30 minutes to 1 hour longer. An instant-read thermometer inserted into the thickest part of the thigh, near the bone should read 180 degrees F (82 degrees C). Remove the turkey from the oven, cover with a doubled sheet of aluminum foil, and allow to rest in a warm area 10 to 15 minutes before slicing.

U can choose anything in here...